September 7, 2012

It's football Season....and fall is fast approaching!

With fall fast approaching(I didn't think we would survive the crazy heat of the summer but we did woo hoo) and football season upon us, what better recipe to have than one that is something to munch on during the game and pumpkin flavored?! Here is a great little gem that is so easy to make and super yummy! And let me tell you, its superb on ice cream(oh ya) or in some Greek yogurt for breakfast if you want to go a more healthy route but also great alone as a snack.....however Beware: Addiction is upon you!!!

4 cups Old fashioned rolled oats (use gluten free if your sensitive to gluten)
2 tsp Ground cinnamon
1 tspPumpkin pie spice
1/2 cup Baking stevia OR 1 cup sweetener of choice that measures like sugar 1
1/2 tsp Salt
1 tsp Baking powder
3/4 cups Pumpkin
1/2 cup Applesauce (unsweetened)
3 tbsSugar free maple syrup (or honey or agave nectar)
Optional Add-ins: 1/2 cup white chocolate chips, 1 cup honey teddy grahams lightly crushed


INGREDIENTS:
4 cups Old fashioned rolled oats (use gluten free if your sensitive to gluten)
 2 tsp Ground cinnamon
1 tsp Pumpkin pie spice
1/2 cup Baking stevia OR 1 cup sweetener of choice that measures like sugar 
1/2 tsp Salt
1 tsp Baking powder
3/4 cups Pumpkin
1/2 cup Applesauce (unsweetened)
 3 tbs Sugar free maple syrup (or honey or agave nectar)
Optional Add-ins: 1/2 cup white chocolate chips, 1 cup honey teddy grahams lightly crushed, 1 cup of nuts


DIRECTIONS:
Preheat the oven to 325 degrees. Line a baking sheet with parchment paper, or foil and spray with non-stick cooking spray. Mix the dry ingredients in one bowl, and the wet ingredients in another. Mix the wet ingredients into the dry using a spatula, (or your hands), until everything is well combined and oats are coated with wet ingredients.
Place granola on baking sheet and bake for 20 minutes, then stir granola around. Bake for an additional 20 minutes or until the granola is golden brown and is crisp. Take the granola out of the oven, and let it cool completely on the baking sheet. Stir in additional white chocolate chips or teddy grahams at this point if desired. Store in an airtight container for up to one week.

Pumpkin Pie Granola (Nut Free)
***COMING SOON*** look for some crafty goodness coming soon to Yaqui Hay and Feed located in Huachuca City down in Amy's area of Sierra Vista. Also more online goodies coming to the facebook page so stayed tuned!!!


March 15, 2012

DIY Flip Flops and Easter Galore!

We have been blessed with amazingly warm weather, down here in sunny southern AZ, and with the warm weather comes shorts and flip flops. So, for our DIY thursday, we stumbled upon a super cute n sassy blog, 
The mother Huddle, and her DIY flip flops.
OMG are they cute!

To cute to pass up, and need to make your own? Go Here to see her step by step tutorial. She even has other diy flip flops as well!

 Easter is just a hop around the corner, so after some Pinteresting, here is what I gathered to share:
Use double sided sticky dots! stick on and roll in glitter!
Little chicks using an egg carton and simple craft feathers.

 Great kids craft! Decorate plastic cups into easter critters!
Carrot treats. Use pasttry bags and fill with gold fishes.
 Love This! Hit up your feed store and get a chick water/feed lid. Attach it
to a glass jar and fill with candies!
Super cute centerpiece using those marshmellow bunnies!
Enjoy all these cute Easter themed ideas!


March 13, 2012

Tasty Tuesday

A lot has been going on in the world of Sisterly Charms lately!! Amy has been busily crafting away for her debut in a tack and feed store down south with her western line! If you haven't checked out our Facebook lately, be sure to head on over Here and see all the amazing things she has made, she is quite talented that one :) I moved from good ol' Show Low to Mesa and am starting a new job! I couldn't be more excited to finally start my career in the medical field, no worries though I still have that major urge to craft especially now that I have an entire house to decorate! I'll just need to keep in mind that I can't keep everything!

Anyways, enough updating we are here for the food right?! So those of you who live in Mesa, Gilbert and surrounding areas are probably aware of this TERRIFIC place where you get great sweet pulled pork.....any guesses? For those of you who don't or have never been, this place is a really great Fresh Mexican Grill that has great deals on Taco Tuesday and seriously their Tacos and Pork Salads are aaaaamazing.

Well I was introduced to this great place by none other than Ruth Hatch. I remember every time she would come down, we always went and ate here and boy am I glad! Given recent and upcoming events, I figured what better way to honor this great lady than by featuring a recipe of one of her favorites....Cafe Rio Sweet Pulled Pork! This recipe is super easy, slow cooker so who doesn't love that, and makes great tacos, burritos, or even on a salad.


Before I write out the recipe, a shout out is in order to Six Sisters Stuff because while surfing their site for recipes, I stumbled across this one! They also have a great recipe for the rice you can get at Cafe Rio that has the great lime flavor a fresh cilantro yummmm yummm.


Here's What You'll Need:
3 lb. pork roast (shoulder, butt, or loin roast all work great- I have used them all)
16 oz. chunky salsa
1 can Dr. Pepper or Coke (NOT Diet)
2 c. brown sugar
Simple Right?! Just Wait the directions are even better......
Put Pork Roast in crock pot and fill about half way with water, then cook for 4 hours on HIGH. Drain your water, cut pork into three sections and replace in crock pot. Mix together soda, brown sugar, and salsa and add to the crock pot. Cook for 4 more hours on LOW. Then drain your liquid, keeping sure to save some to add to the pork so that it is moist, and shred.
Whala! Easy Peasy. Now just decide how you want to use it and enjoy this deliciousness!

February 28, 2012

Recipe Tuesday - Buffalo Chicken Dip

Here is a great recipe for an appetizer that is a crowd pleaser wherever I take it.

Franks Red hot Buffalo chicken dip!
What you need:
  • Bottle of Franks Red hot Sauce
  • 1 Rotisserie Chicken Shredded
  • 1 package cream cheese softened
  • 1 cup sour cream
  • Shredded Cheddar Cheese to liking
  • Tortilla chips for dipping
  • Green onions (optional)
what you do:

Just blend your sour cream and cream cheese together. Add as much hot sauce to your liking ( I usually do half a bottle). Mix in your pre shredded chicken and shredded cheese. If a little thick, add some more sour cream to get the consistancy to your liking. Spread mixture in a baking dish, top with more chees, and bake at 350 Degrees until bubbly, usually 20 minutes.
Top with Green onions if you like and serve with tortilla chips! so yummy and so easy!
Enjoy!


February 16, 2012

DIY Thursday: Bow Holder!

UMMM How adorable is this?!?!

If you are anything like this fetching little gal's mom and aunt(a.k.a Amy and I)......... 

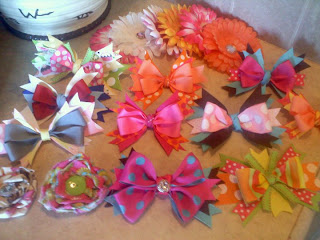
Then your collection of those cute hair bows to accessorise ANY outfit looks like this......


So why not create something with functionality but also with some great eye appeal? This would look so cute in any little girls room and the best thing is that you can customize it for any little girls room!


All You Need:
A Great Frame-however big or small, round or square
Fabric
Glue Gun or Staple Gun
Coordinating Ribbon
Wood Letter
Paint

Directions:
1. Start by Measuring out the length of the ribbon, just depending on how long you want it. Also Paint your wood letter.

2. Then remove the glass from the frame you choose. Be sure to keep the cardboard insert or using the glass, cut a piece from a box if its those annoying ones that aren't the full size of the frame :)

3. Wrap the cardboard with the fabric you choose and either hot glue or staple it down to the cardboard, making sure no wrinkles happen.

4. Push fabric covered cardboard back into the frame and place the back insert back in to ensure a nice snug fit!

5. Using a very thin thin line of hot glue, center and glue on your wood letter.

6. Dab a bit of hot glue on the end of your cut ribbon and attach to the bottom backside of your frame!

7. Optional: you can either decide to use the hanger on the back of the frame or to jazz it up a bit, add some ribbon to the top and create a hanger :)


Now WHALA you have a great place to organize all those great hair accessories and something great to looks at as well!!!

We hope you enjoyed todays get crafty DIY and remember we LOVE to see pics if fellow bloggers attempt any crafts so feel free to send them to us! Here is to a happy Thursday!